Visit My Etsy Shoppe

Etsy Shop

Tuesday, February 19, 2013

New Design Finished and ready for Market


I am so excited it is finished. 
The name is "Les Fleurs Chics"
I have the directions for you to either cross stitch the whole thing or do ad I did and just cross stitch the leaves, stems, and vase. Then you can applique the flowers. It was so much fun and I added some fiberfill underneath some of the petals to make them more dimensional. 
So if you are happy to cross stitch then this is for you and if you are adventuresome with your stitching then this is for you too. It will be available March 4th. The model is on the way to the trade show in Nashville. Also I am anxious for the stitched flowers to come back from April. When they do I will have more to share with you. I will finish those as small pillows, this way you can see what the stitched flowers will look like too.

Oh and one more huge thing :>).
Here is the finished photo of the design that I made for Just Cross Stitch magazine and if you like then you can purchase the magazine. The flowers are a good size that you can stitch them individually and make scissor fobs or small pincushions, or how about making needle books. 
Oh just have fun stitching and keeping out of trouble :)  
donna


Tuesday, February 12, 2013

Sharing my progress on a new design

sorry a bit wrinkled but i was in a rush

Happy day to all of the stitching souls out there :>)
I am sharing my progress on my new design. It does not have a name yet but any suggestions would be appreciated. And if I do pick one that you suggest I will send you a chart of the design for free. Yeah!!!
I have the vase complete with some bead work and some Rhodes stitches, eyelets, along with a little satin stitching. Then the leaves are complete with a few baby's breathes stitched with french knots in the center. And the last thing will be the flowers. I am having 5 large flowers that will be made with wool applique. And don't worry if you do not like to do wool applique  I am including the directions so that the 5 large flowers can be cross stitched :>) with some Weeks Dye Works floss.
This design will be released at TNNA in Nashville. So if your shop that you usually shop at is going to the show have them stop by Nordens booth because they will have the model and the charts.
So here is my sharing for today and I am off to visit mom
donna

Sunday, February 10, 2013

Free Chart For Easter - Bunny


i just labeled some of my older giveaways as FREE DESIGNS and this one is the only that stayed at the top of the post page ? dont know why but I have to leave it here so if you never saw this one before , here you go :))


Yes Easter is still a bit away but I want you to have time to stitch up this little guy or girl. You can change the colors of the flowers to match your decor. Just pick 3 shades (light, med, and dark) of your favorite color and exchange them for mine.
You should be able to click on the white chart below and print from your computer.
Have a great weekend.
donna

Friday, February 08, 2013

Free Tutorial For Wool Roses


Happy Blizzard to everyone. :(
I have the directions to share with you for the wool roses that I made the other day
Here We Go
 Cut or rip your wool strips into 1 inch wide by however long you would like. The small ones in the wool tree that I made were 10 inches long. These are a bit longer at 14 inches.. After you have the strips, fold them in half and take your scissors and make a free hand scallop edge on one side only. See photo above. 
Thread your needle with a knot at one end. Starting at one end of the wool strip and make sure it is the straight edge make a running stitch all the way to the other end. My running stitches are about a 1/4 inch wide. Then pull your thread (not to tight) because you just want a ruffle and not a very tight ball of wool :). Secure the thread at the end so your ruffle does not come apart and get lose.  
 Start to roll your wool strip from one end. Hold it together and start to secure your rose bud with your threaded needle and a knot on the underside (The straight edge). 
 Close-up
 Keep rolling about 2-3 inches at a time and keep securing it underneath with your threaded needle. 

 When finished just secure the thread underneath with a knot and set aside
 For leaves I usually cut a long strip of wool 1 inch wide by however long I can and then I cut it into 1 inch squares. I cut around 2 opposite sides to form leaves. See sample above 
 Just waiting for the glue gun :)
An presto, all done. I like to glue these onto clothespins and place on curtains, my jacket, or anywhere for decorating. If you use the tiny clothes pins these would look great in a tree. How about different colored wool, maybe a plaid. The leaves could be a plaid also or an over-dyed wool.
 Well I hope you have fun with these, they work up easy and no two are ever the same just like real flowers :)
Oh and I wanted to mention that last weekend I was at Camp Wool for her new shop open house and she has a new web also. Here is the link. I have posted a picture of my giveaway that I had and yes I crocheted the basket :)
The other picture is of my little display. It was so nice to be there and so many people, it was fun, check out her shop, lots of warm wool, inspiration and antiques. Give her a visit if you are near! 


Here is a link to my directions for the Wool/Feather Tree .....these have been available since 2012
This is a PDF pattern with directions to make wool feather trees. Directions are given for a 8in, 12in, 18in, 24in, and a 36in trees. There are approx 25 color photos and clear directions for you to follow.
The tree in the above photo is the 36 inch tree I made...It is a spring time green and I have added so many of the clip-on wool flowers in pink....


Thursday, January 31, 2013

a couple quick notes :)

Just a few quick notes for you and then I am off to get ready for LeAnns open house at Camp Wool in Kennebunk Maine :)
This is the crochet cotton I used for my hearts and a size D hook :) because some of you have asked

This a tiny peek of a new design that will have wool applique and cross stitching. I sent 3 flowers to April to stitch for me because you do not have to do applique if you do not want too so I am giving you the directions to stitch it also. She is stitching up a few of the flowers so I can finish them as tiny pillows 

This is a picture of one of the many roses that I made to add to my 36inch wool feather tree that I  made. I am going to Camp wool tomorrow and Saturday to demonstrate how to make them at her Open House. 

Do you see the tiny bird. He matches the tree!!

After this weekend I will post on line the free directions on how to make these cute little roses.
donna

Monday, January 28, 2013

And the winners are Rita  and Raffaella . So as soon as they get me their mailing address' I will get those out for them. I would have posted earlier but had to bring hubby to the hospital again on Saturday and I had my grandson this weekend. But all will be well :) I am sure. I will have more to post soon just waiting to finish getting the trunk show ready for Camp Wool and finish a couple of wool trees too. Have a good night and to those that did not win there is always next time :). But yes thank you for all of your kind comments too!!
donna

Wednesday, January 23, 2013

Free Crochet Heart Directions Are Here


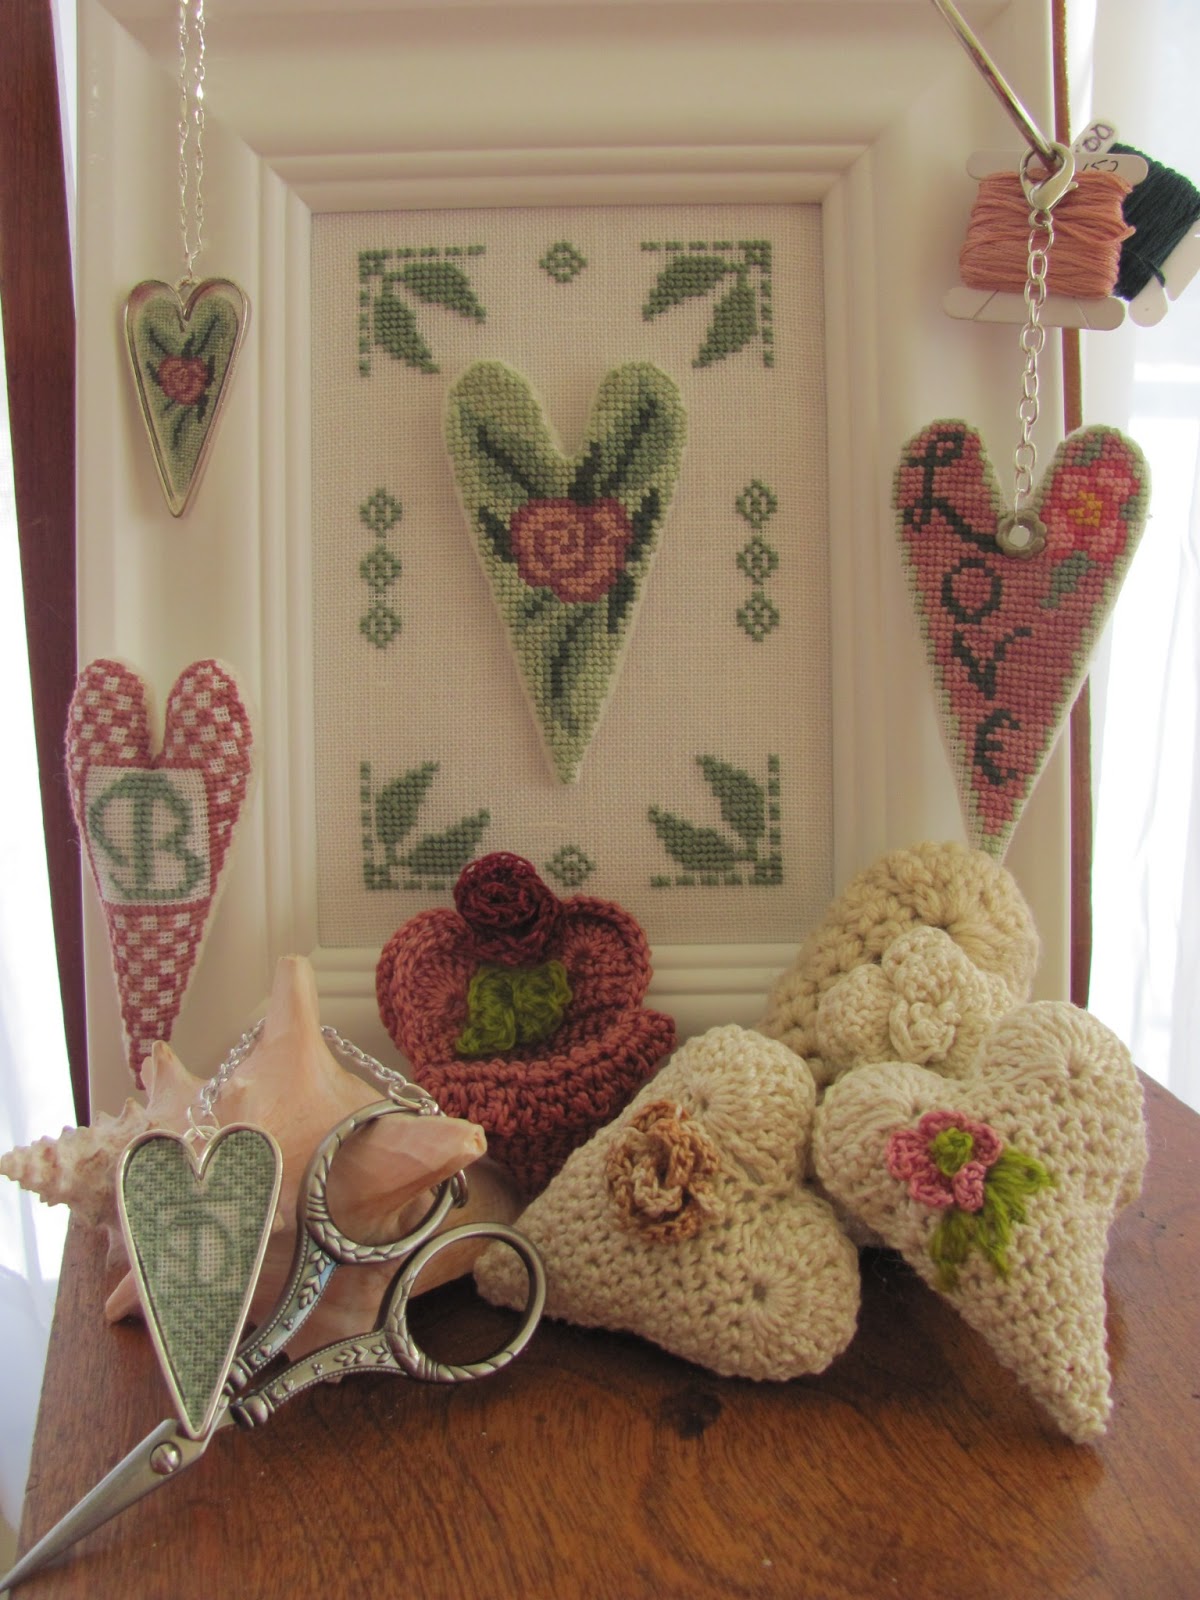
I have been making so many of these hearts, I just love the pattern and they stitch up pretty quick.
I added small flowers to the tops or you could embroider on top too. Crochet some small flowers or make some from wool or how about some stitched spider web roses with wool leaves. I always wanted to have a heart collection and this is my start along with the stitched ones from the "Heart To Heart" pattern. I am in the process of making about 12 of these hearts and stitching them together to make 6 small  puffy hearts. I will string them together with huge beads to separate them, then I will hang them in one log vertical string of hearts and hang it in my office. I just love color :))

Well enough of my jabber here are the directions:

Chain 2
2 sc in 2nd chain from hook, chain 1 and turn
2 sc in 1st sc, sc in next sc, chain 1 turn
2 sc in 1st sc, sc in the next 2 sc, chain 1 turn
Continue with this pattern of making 2 sc in the first sc of each row. this is your increase of each row.
Continue with the pattern until you have 16 sc across.At the end of this row ch 1 and turn.
Next: skip 3 sc and make 10 tr = treble (triple) crochet or you can use a double crochet instead of the triple, you can hardly notice the difference :))-- do this in the 4th ch from hook, (1st hump)
skip 3 more sc and then sc in the next sc (which is the 8th sc from hook), this will make your valley,
then skip the next 3 sc's and make another hump of 10 tr = treble (triple) crochet   {which is the 12th sc from hook},
then you will slip stitch in the last sc of the row.


You are all finished. weave in your ends and have fun. I actually make 2 for each heart puff and stitch them together. (Dont forget to stuff it with fiberfill before you close it up if you want it puffy)
Once you get the pattern down of increasing the row and making up to 16sc across, then always skipping
3 sc across the top for the humps you will be a machine, HAHA!!
Here Are Some Photos Of The Progress And I just made this one- I did add The Spider Web Rose


Mary Corbet has a great tutorial on the spider web rose. I just added some wool leaves after I made the rose :) I also did not stuff this heart but sewed 2 together to make it extra thick.


I hope you enjoy these and if you make some and would like to share a photo I would love to post it.
 Have a good night And I will have the drawing on Saturday for the give-aways so keep leaving thoses messages, it's not to late
donna

Tuesday, January 22, 2013

Having a Heart To Heart Giveaway


Well we were suppose to have so much snow today and we have nothing. Not that I am complaining but I think some weather men need new jobs :). No I really feel bad for then because I am sure everyone comes down on them when they are wrong :((
I just updated Etsy with my "Heart To Heart" chart in a PDF form and I also added the Patera heart pendants that the designs fit into. But most important for you is that I am having another give-away.
So please leave me a message that you are interested and I will be giving away not just 1 but there will be 2 lucky winners. And included with the chart for this give-away will be a silver Patera Pendant so you can stitch yourself a gift.
Have a good day and I will post directions soon for the crochet heart , promise !!
donna

Friday, January 18, 2013

Heart To Heart

I want to thank everyone for their kind words, it means a lot to me.The sun did come out yesterday and I have kept busy working. I did all of the finishing work on my new design called "Heart To Heart"

This is a pic of some of the hearts. You can stitch them over one on 28ct linen and it will fit great into this heart pendant by Nunn Designs. I added a chain and lobster claw to hang  from my new scissors that April sent me :) I will have the pendants available on my Etsy shop shortly. Also, the larger heart with the letter B is cross stitched and then sewn  like a tiny pillow with a pin back. I will be pinning mine to my stitching bag. This chart will include an alphabet that fits perfect in the squares so you can make them for anyone

This heart was cross stitched, then Fray Check was added to the outside edges, and let dry. Then, a cardboard heart was cutout, slightly smaller than the stitched heart. Then, glue was applied to the edges of the cardboard heart and the stitched fabric was glued down and around to the back of the cardboard.  Next I glued a piece of felt to the back to hide the glued and folded over area. After it dried I added a grommet , chain, lobster claw and then attached it to my floss ring. If you notice also I did not stitch the center heart in the frame to the framed fabric. I made the heart separate like the others and then I pinned it in the center of the frame. That way I can change my hearts. Maybe you could make some hearts with the first letters of your children's names and if their heart is in the center of the frame for the day, then it is their special day :)   Just a idea. to make someone feel special


If you notice I have some crocheted hearts in the photo because I will add the directions for these crocheted hearts on my blog this weekend. These are quick and easy to make, A simple pattern to follow that I came up with. That is what I have been doing late at night just crocheting hearts :)
So many ideas to make with them and yes this is the season of LOVE
Pass it on
donna

About Me

My photo
Hi everyone, my name is Donna. I just love stitching of all sorts, I also love antique, and book stores. I am married and I have 2 children, and 3 grandchildren :). My Christian faith is the foundation of my life, and has sustained me through the ups and downs of this journey. Keep spreading kindness so you can change the world. So glad you stopped by, leave me a message and I will stop by and visit you.

Blog Archive

Stitch An Inch Fall

Stitch An Inch Fall