Wednesday, July 02, 2025
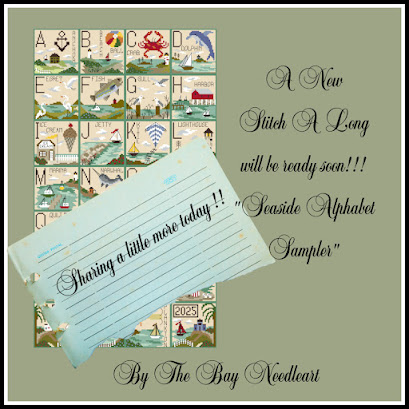
And the Full Reveal!! Seaside Alphabet Sampler Stitch A Long
Monday, June 30, 2025
Thursday, June 26, 2025
New Stitch A Long Coming SOON!!!
I wish I could share a picture but not yet!! :) Only this silly PEEK!!
The new Stitch A Long is a Seaside Alphabet Sampler.
I have been working really hard to get this one complete so we can work on it this summer and I just finished designing it...
And onto to completing all of the directions and photos for presentation!!
But I could not wait to tell you a little something about it😉
It will have 7 release sections, 4 letters each except the last section that will have 2 letters plus 2 other small designs.
The Stitch Count is 168 x 293
Watch for more infomation coming soon
Hugs
donna
Wednesday, June 25, 2025
This weeks Sale is "Brave Boat Harbor"
Thursday, June 19, 2025
The Nubble is on SALE!
Tuesday, June 03, 2025
Having fun with fabric painting and Embroidery
Monday, May 19, 2025
Colonial Home and Centerpiece Coming soon!!
Thursday, May 08, 2025
Beloved will be available next weekend!!
Thursday, April 24, 2025
Having a SALE on Dear Mom just in time for Mothers Day
Monday, April 21, 2025
I've been missing for a while :(
Good Morning,
I have not been able to do much By The Bay creating or managing for over a month. Sorry I wish I could be more consistent but life keep throwing me curve balls....so my husband says ;)
Hubby went in for shoulder surgery and things did not go well. He came down with an infection a little over a week later and had to have emergency surgery to see what was going on.
The surgeon had to take all of the pins out that he put in and some muscle just a couple of weeks before. So hubby has spent quite a while in the hospital. He is on IV antibiotics 3 times a day that I infuse for him, we also have my mom that is 90 years old living with us...she is pretty much independant but does need some things attended to.
And we also hosted a Passover Seder at a local Comunnity Center this past Monday.....I did all of the cooking and the shopping for everything, helping to set up and serving.....oh HAHA one more thing too ......I am cat/house sitting for 3 weeks.
So ..... to make it quick , I have been very busy, but every night before bed I do get about an hour of stitching time in......
I do have the stitched girl that is finished...Her name will be "Beloved". Also with her I have an option to stitch her without the alphabet, and instead there will be long roses coming up on each side of her.
I do have a tall vase of flowers that is finished....I love them ....they are very simple. This is the photo of the applique design I made that is 3Dimensional, I loved the Simplicity of it so I designed it into a cross stitch design. I will share that sometime soon too....
I do have a Home scene that I am stitching but instead of my usual seaside this one has the same flowers that I used in the previous vase so you could have matching stitched designs. (No photo yet)
I am working on a Stitch A Long too.....I have 3 sections finished (Designing that is)
I also have a summer seaside scene that I have been saving since 2018....time to release it HAHA (You'll have to wait a bit longer to see it)
Hopefully things will settle soon, and I can get more time for By The Bay.
Spring is in the air and I hope you can hear the birds 🐦chirping and see the flowers🌼 peeking up to wish you well.
I will keep in touch as soon as I can.
Happy Stitching, Try to have a good laugh and smile today 😉
Hugs
donna 💗
About Me

- Donna
- Hi everyone, my name is Donna. I just love stitching of all sorts, I also love antique, and book stores. I am married and I have 2 children, and 3 grandchildren :). My Christian faith is the foundation of my life, and has sustained me through the ups and downs of this journey. Keep spreading kindness so you can change the world. So glad you stopped by, leave me a message and I will stop by and visit you.

.jpg)


.jpg)


%20(1).jpg)

.jpg)

.jpg)
.jpg)
.jpg)
.jpg)